 Pre built UI
Changing Style via CSS
Updating the CSS allows you to change the UI of our components to meet your needs.
This section will guide you through an example of updating the look of buttons. Note that the process can be applied to update any HTML tag from within SuperTokens components.
Global style changes#
How to make changes#
Check here to see how you can find the selector to overwrite.
Each stylable components contains data-supertokens attributes (in our example data-supertokens="link").
Let's add a border to our link elements. The syntax for styling is plain CSS.
- ReactJS
- Angular
- Vue
// this goes in the auth route config of your frontend app (once the pre built UI script has been loaded)
(window as any).supertokensUIInit("supertokensui", {
    appInfo: {
        apiDomain: "...",
        appName: "...",
        websiteDomain: "..."
    },
    recipeList: [
        (window as any).supertokensUIEmailVerification.init({
            style: `
                [data-supertokens~=link] {
                    border: 2px solid #0076ff;
                    border-radius: 5;
                    width: 30%;
                    margin: 0 auto;
                }
            `,
        })
    ]
});
import SuperTokens from "supertokens-auth-react";
import EmailVerification from "supertokens-auth-react/recipe/emailverification";
import Session from "supertokens-auth-react/recipe/session";

SuperTokens.init({
    appInfo: {
        apiDomain: "...",
        appName: "...",
        websiteDomain: "..."
    },
    recipeList: [
        EmailVerification.init({
            style: `
                [data-supertokens~=link] {
                    border: 2px solid #0076ff;
                    border-radius: 5;
                    width: 30%;
                    margin: 0 auto;
                }
            `,
        }),
        Session.init()
    ]
});
// this goes in the auth route config of your frontend app (once the pre built UI script has been loaded)
(window as any).supertokensUIInit("supertokensui", {
    appInfo: {
        apiDomain: "...",
        appName: "...",
        websiteDomain: "..."
    },
    recipeList: [
        (window as any).supertokensUIEmailVerification.init({
            style: `
                [data-supertokens~=link] {
                    border: 2px solid #0076ff;
                    border-radius: 5;
                    width: 30%;
                    margin: 0 auto;
                }
            `,
        })
    ]
});
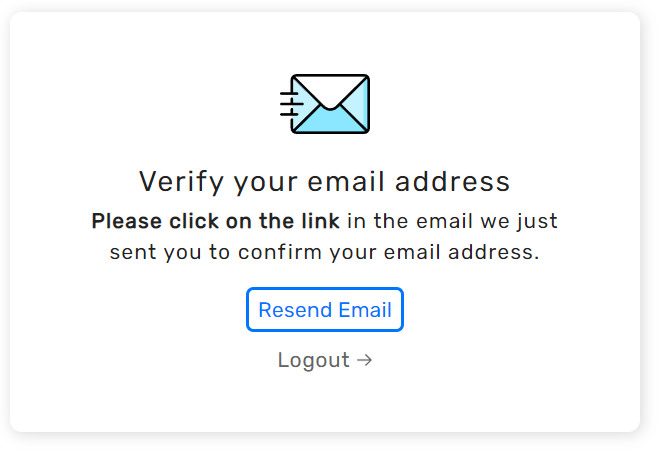
The above will result in:
Changing fonts#
By default, SuperTokens uses the Arial font. The best way to override this is to add a font-family styling to the container component in the recipe configuration.
- ReactJS
- Angular
- Vue
// this goes in the auth route config of your frontend app (once the pre built UI script has been loaded)
(window as any).supertokensUIInit("supertokensui", {
    appInfo: {
        apiDomain: "...",
        appName: "...",
        websiteDomain: "..."
    },
    recipeList: [
        (window as any).supertokensUIEmailVerification.init({
            style: `
                [data-supertokens~=container] {
                    font-family: cursive
                }
            `
        }),
    ]
});
import SuperTokens from "supertokens-auth-react";
import EmailVerification from "supertokens-auth-react/recipe/emailverification";
import Session from "supertokens-auth-react/recipe/session";

SuperTokens.init({
    appInfo: {
        apiDomain: "...",
        appName: "...",
        websiteDomain: "..."
    },
    recipeList: [
        EmailVerification.init({
            style: `
                [data-supertokens~=container] {
                    font-family: cursive
                }
            `
        }),
        Session.init()
    ]
});
// this goes in the auth route config of your frontend app (once the pre built UI script has been loaded)
(window as any).supertokensUIInit("supertokensui", {
    appInfo: {
        apiDomain: "...",
        appName: "...",
        websiteDomain: "..."
    },
    recipeList: [
        (window as any).supertokensUIEmailVerification.init({
            style: `
                [data-supertokens~=container] {
                    font-family: cursive
                }
            `
        }),
    ]
});
Using media queries#
You may want to have different CSS for different viewports. This can be achieved via media queries like this:
- ReactJS
- Angular
- Vue
// this goes in the auth route config of your frontend app (once the pre built UI script has been loaded)
(window as any).supertokensUIInit("supertokensui", {
    appInfo: {
        apiDomain: "...",
        appName: "...",
        websiteDomain: "...",
    },
    recipeList: [
        // ...
        (window as any).supertokensUIEmailVerification.init({
            // ...
            style: `
                [data-supertokens~=link] {
                    border: 2px solid #0076ff;
                    borderRadius: 5;
                    width: 30%;
                    margin: 0 auto;
                }

                @media (max-width: 440px) {
                    [data-supertokens~=link] {
                        width: 90%;
                    }
                }
            `,
        }),
    ],
});
import SuperTokens from "supertokens-auth-react";
import EmailVerification from "supertokens-auth-react/recipe/emailverification";

SuperTokens.init({
    appInfo: {
        apiDomain: "...",
        appName: "...",
        websiteDomain: "...",
    },
    recipeList: [
        // ...
        EmailVerification.init({
            // ...
            style: `
                [data-supertokens~=link] {
                    border: 2px solid #0076ff;
                    borderRadius: 5;
                    width: 30%;
                    margin: 0 auto;
                }

                @media (max-width: 440px) {
                    [data-supertokens~=link] {
                        width: 90%;
                    }
                }
            `,
        }),
    ],
});
// this goes in the auth route config of your frontend app (once the pre built UI script has been loaded)
(window as any).supertokensUIInit("supertokensui", {
    appInfo: {
        apiDomain: "...",
        appName: "...",
        websiteDomain: "...",
    },
    recipeList: [
        // ...
        (window as any).supertokensUIEmailVerification.init({
            // ...
            style: `
                [data-supertokens~=link] {
                    border: 2px solid #0076ff;
                    borderRadius: 5;
                    width: 30%;
                    margin: 0 auto;
                }

                @media (max-width: 440px) {
                    [data-supertokens~=link] {
                        width: 90%;
                    }
                }
            `,
        }),
    ],
});
Customising individual screens#
Send email screen#
This screen is where the user is redirected if mode is set to REQUIRED and they visit a path that requires a verified email.
- ReactJS
- Angular
- Vue
// this goes in the auth route config of your frontend app (once the pre built UI script has been loaded)

(window as any).supertokensUIInit("supertokensui", {
    appInfo: {
        apiDomain: "...",
        appName: "...",
        websiteDomain: "...",
    },
    recipeList: [
        (window as any).supertokensUIEmailVerification.init({
            sendVerifyEmailScreen: {
                style: ` ... `
            }
        })
    ]
});
import SuperTokens from "supertokens-auth-react";
import EmailVerification from "supertokens-auth-react/recipe/emailverification";
import Session from "supertokens-auth-react/recipe/session";

SuperTokens.init({
    appInfo: {
        apiDomain: "...",
        appName: "...",
        websiteDomain: "...",
    },
    recipeList: [
        EmailVerification.init({
            sendVerifyEmailScreen: {
                style: ` ... `
            }
        }),
        Session.init()
    ]
});
// this goes in the auth route config of your frontend app (once the pre built UI script has been loaded)

(window as any).supertokensUIInit("supertokensui", {
    appInfo: {
        apiDomain: "...",
        appName: "...",
        websiteDomain: "...",
    },
    recipeList: [
        (window as any).supertokensUIEmailVerification.init({
            sendVerifyEmailScreen: {
                style: ` ... `
            }
        })
    ]
});
Verify link clicked screen#
This is the screen shown to users that click the email verification link in the email.
- ReactJS
- Angular
- Vue
// this goes in the auth route config of your frontend app (once the pre built UI script has been loaded)

(window as any).supertokensUIInit("supertokensui", {
    appInfo: {
        apiDomain: "...",
        appName: "...",
        websiteDomain: "...",
    },
    recipeList: [
        (window as any).supertokensUIEmailVerification.init({
            verifyEmailLinkClickedScreen: {
                style: ` ... `,
            }
        })
    ]
});
import SuperTokens from "supertokens-auth-react";
import EmailVerification from "supertokens-auth-react/recipe/emailverification";
import Session from "supertokens-auth-react/recipe/session";

SuperTokens.init({
    appInfo: {
        apiDomain: "...",
        appName: "...",
        websiteDomain: "...",
    },
    recipeList: [
        EmailVerification.init({
            verifyEmailLinkClickedScreen: {
                style: ` ... `,
            }
        }),
        Session.init()
    ]
});
// this goes in the auth route config of your frontend app (once the pre built UI script has been loaded)

(window as any).supertokensUIInit("supertokensui", {
    appInfo: {
        apiDomain: "...",
        appName: "...",
        websiteDomain: "...",
    },
    recipeList: [
        (window as any).supertokensUIEmailVerification.init({
            verifyEmailLinkClickedScreen: {
                style: ` ... `,
            }
        })
    ]
});
